How to Freeze-dry Marijuana Seeds (So They Last for Years)


You’ve worked hard to make good seeds. Now you want them to last—years, maybe decades. That’s where learning to Freeze-dry seeds comes in. In plain speak, you’re gently turning the water in your seeds into ice, then into vapor, without dunking the embryo in a soggy mess or cooking it dry. It sounds fancy, but with the right steps (and a few smart alternatives if you don’t own a lab machine), you can do it safely.
Below, you’ll get a clear, step-by-step guide, real-world tips, target numbers, a specs table, pros and cons, and answers to the questions growers ask most. No fluff—just the know-how you can use today.
First, What “Freeze-dry seeds” Actually Means

When you Freeze-dry seeds, you’re doing lyophilization:
- You freeze the seeds solid.
- You pull a deep vacuum so ice skips the liquid stage and turns straight into vapor (that’s sublimation).
- You finish by warming the seeds under vacuum to drive off the last “bound” moisture.
Why this matters: liquid water can swell cells and crack delicate tissues. Ice can too—if it melts and refreezes. Sublimation avoids the splashy middle step that does the damage.
The Seed Biology (in easy language)
Think of a seed like a tiny sleeping baby plant wrapped in a crunchy coat. Inside are fats, sugars, and proteins—plus a little water. Too much water + deep cold = sharp ice crystals. Too little water + heat = brittle, damaged cells. The win is a sweet spot: very dry + very cold + very still.
Target Moisture (the most important number)
For cannabis, you want seeds very dry before real freeze-drying or long cold storage:
- Safer target moisture: 3–6% moisture content (by weight).
- If you can’t measure moisture, use weight change + desiccant indicators (explained below).
Should You Freeze-dry Marijuana Seeds?

Great reasons to Freeze-dry seeds
- You’re a breeder or seed bank archiving genetics long-term.
- You need to ship seed stock through hot/humid routes and want extra safety.
- You want maximum shelf life at –18 to –20 °C (home deep freezer) or colder.
Times you might skip it
- You only store seeds for a year or two. Silica-gel drying + Mylar + freezer already gets you far.
- You don’t have access to a true lyophilizer and don’t want to risk DIY vacuum hacks.
- Your seeds are freshly made and not yet fully matured/cured (finish ripening/cure first).
Tip: If you run a home grow and don’t plan on deep archiving, you can do “near-freeze-dry results” with desiccant drying + vacuum seal + deep freeze. I’ll show you both approaches.
Gear You Can Use (From Pro to Practical)
Option A: Lab-grade freeze dryer (best but pricey)
- Shelf temperature control (–40 °C to +50 °C range).
- Deep vacuum (~100–300 mTorr / 0.1–0.3 Torr).
- End-point detection and safe venting.
Option B: “No-lyo” home method (budget-friendly)
- Airtight jars, silica gel (indicator beads help).
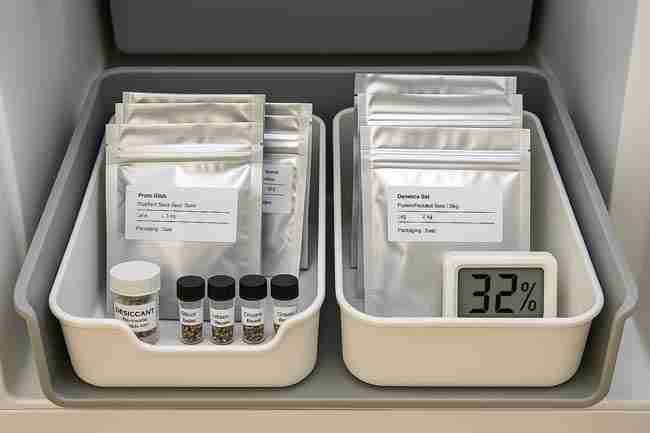
- Mylar or glass vials + vacuum sealer + oxygen/moisture absorbers (correctly sized).
- Home deep freezer (–18 to –20 °C).
- Hygrometer cards or tiny data loggers for RH checks.
You can’t truly Freeze-dry seeds without a lyophilizer, but you can dry them to safe moisture and deep-freeze for long storage with excellent results.
Specifications at a Glance (Bookmark This)

| Parameter | Target / Range | Why it matters |
|---|---|---|
| Pre-dry moisture | 3–6% | Safer before deep cold; lowers ice damage risk |
| Pre-freezing temp (lyo) | –35 to –50 °C | Fast freezing forms smaller ice crystals |
| Chamber pressure (lyo) | 100–300 mTorr | Promotes sublimation (ice→vapor) |
| Primary dry shelf temp | –25 to –10 °C | Keeps ice solid while it sublimates |
| Secondary dry shelf temp | +10 to +25 °C | Removes bound water without cooking seeds |
| Primary dry duration | 8–24 hrs | Depends on batch size/thickness |
| Secondary dry duration | 4–12 hrs | Finish to lower residual moisture |
| Storage temp | –18 to –20 °C | Home deep freezer, stable and dark |
| Storage packaging | Mylar (3.5+ mil) or glass vials, vacuum-sealed with desiccant | Blocks oxygen, moisture, light |
| Thawing | Sealed to room temp before opening | Avoids sweaty condensation on seeds |
Use those ranges as guardrails. You don’t need to hit the bullseye on every number, but staying near them massively boosts viability.
Step-by-Step: True Freeze-Dry Seeds (Lyophilizer Method)

You’ve got a lyophilizer? Nice. Here’s your playbook.
1) Pre-dry (don’t skip this)

- Put seeds in a clean, breathable pouch like paper tea bags inside an airtight jar.
- Add fresh silica gel (indicator beads help—when they turn from colored to clear, they’re “full”).
- Leave at room temp for 48–72 hours, swapping or recharging silica if indicators say so.
- For maximum precision, weigh 100 seeds at start and every 12 hours; a flattening weight curve = approaching dryness.
Goal: get near 3–6% moisture before you freeze anything. Wet seeds + deep cold = cracked embryos.
2) Load the trays thin
- Spread seeds in a single layer (no piles) on parchment atop the lyophilizer trays.
- Label each batch (strain, date, lot). Future you will thank you.
3) Pre-freeze fast

- Chill shelves or pre-freeze trays to –40 °C for ~1–2 hours.
- Fast freezing = smaller ice crystals = gentler on cells.
4) Pull vacuum, start primary drying
- Set chamber to 100–300 mTorr.
- Keep shelf temp below 0 °C (often –25 to –10 °C).
- Let sublimation run until seed tray weight stops dropping (check every few hours) or your machine’s end-point agrees (if equipped).
5) Secondary drying (bound water removal)

- Nudge shelf temp to +10 to +25 °C under the same vacuum for another 4–12 hours.
- Don’t blast heat; you’re not roasting coffee beans—slow and steady wins.
6) Backfill & seal
- Vent with dry nitrogen (if available) or clean, dry air.
- Transfer seeds immediately into Mylar or glass vials with fresh desiccant; vacuum-seal or backfill with inert gas.
- Label everything (strain, generation, date, process notes). Toss in a tiny RH card if you’ve got one.
7) Store cold, dark, and still
- Put sealed packs in a stable, non-frost-free deep freezer at –18 to –20 °C.
- Avoid door bins; that’s the warm bouncy zone. Middle shelves are steadier.
8) Thaw the smart way
- When you need seeds, pull a sealed pack and let it come to room temp while still sealed (usually 6–12 hours for small packs).
- This prevents condensation. Only open once the pack is room temp and dry outside.
No Lyophilizer? The “Near-Freeze-Dry” Home Method That Works

Not everyone has a lab machine. You can still Freeze-dry seeds in spirit—by drying them down safely and freezing cold. Here’s the way.
1) Two-stage silica drying
- Stage A (bulk drying): Seeds + fresh silica in an airtight jar for 3–7 days. Use indicator silica so you know when it needs recharging.
- Stage B (fine drying): Move seeds to a clean jar with fresh silica for another 3–7 days.
- Optional geek move: weigh 100 seeds daily; when weight stabilizes, you’re close to the target.
2) Package right
- Load seeds into Mylar (3.5+ mil) or amber glass vials.
- Add a small desiccant sachet.
- Vacuum-seal (don’t crush!) or gas-flush, then seal. Write labels you can read in five years.
3) Freeze deep
- Store at –18 to –20 °C.
- Avoid frost-free freezers that cycle warm; if that’s all you have, double-bag in Mylar and bury packs in the coldest, least-opened area.
4) Thaw sealed
- Same as the lyophilizer method: come to room temp before opening.
Is it true Freeze-drying? No. Does it protect your genetics for a long time? Absolutely. This method is the workhorse for many careful home breeders.
The “Don’t Do That” List (Troubleshooting Before It Hurts)

- Don’t freeze wet seeds. That’s the #1 seed killer. Pre-dry them first.
- Don’t rush thawing. Opening cold packs invites condensation—tiny water droplets sneak inside seed coats.
- Don’t overheat during secondary drying. Keep it under +25 °C; seeds are alive, not coffee.
- Don’t use oversize oxygen absorbers in tiny vials; they can fight desiccants and create pressure swings.
- Don’t skip labels. Six months from now, “mystery kush baggie” will drive you nuts.
- Don’t store in sunlight or on warm appliances. Light and heat ruin seed lipids.
Real-World Flow You Can Repeat

Picture this: You just harvested seeds from your Green Avenger Seeds keeper mom. You want to stash F2s for a decade.
- Two-stage silica drying for a week.
- Confirm dryness (indicator silica still mostly “dry” + seed weight stable).
- Pack into Mylar with a right-sized desiccant, vacuum-seal, date/strain labels.
- Deep freeze at –20 °C.
- When it’s time to pop a test, you thaw sealed, then open and sow.
Easy rhythm. A few minutes of discipline now saves whole genetics later.
Common Q&A Checks You Can Run

How do I know if seeds are dry enough before I Freeze-dry seeds?
- Use indicator silica—if it stays in the “dry” color for 24 hours, you’re close.
- Weigh 100 seeds daily. When weight stops dropping, you’ve hit a stable moisture floor.
- Seeds should feel hard, glassy, not tacky.
Can I Freeze-dry seeds without a lyophilizer?
- Strictly, no. Practically, you can dry with silica + deep freeze and get long-term results that satisfy most growers.
Do oxygen absorbers help?
- They can. Small packs in Mylar benefit, but don’t oversize them. Always pair with desiccant, because moisture—not oxygen—is the bigger seed killer.
How long will Freeze-dried cannabis seeds last?
- With 3–6% moisture, dark packaging, and –18 to –20 °C storage, years to decades is realistic. Test germination annually.
Does Freeze-drying hurt germ rates?
- Done right, it protects germ rates by preventing ice/heat damage. Done wrong (wet seeds, hot drying), it reduces viability.
Should I test a small batch?
- Yes. Pull 20 seeds after your first run, thaw sealed, and do a germ test. Keep notes and tweak your process.
Can I refrigerate instead of freezing?
- Sure, it’s better than room temp, but freezer is king for serious long-term storage.
What about autoflowers vs photoperiod seeds?
- Same drying and storage rules. All cannabis seeds like dry, dark, cold.
Detailed “Freeze-dry seeds” Checklist (Print This)
- Seeds fully mature and cleaned
- Two-stage silica pre-dry to ~3–6% moisture
- Single-layer tray loading
- –40 °C pre-freeze
- 100–300 mTorr chamber pressure
- Primary dry at –25 to –10 °C, weight stable
- Secondary dry at +10 to +25 °C
- Pack with desiccant, vacuum-seal
- Store –18 to –20 °C (non-frost-free preferred)
- Thaw sealed to room temp before opening
- Annual germ tests and logbook updates
Pros and Cons of Freeze-drying Seeds

Pros
- Maximum longevity for valuable genetics
- Lower ice damage risk thanks to sublimation
- Repeatable if you log temps/pressures/times
- Compact storage with Mylar/vials
Cons
- Equipment cost (lyophilizer isn’t cheap)
- Learning curve (timing, end-point judgement)
- Overkill for casual, short-term storage
- DIY risks if you try to mimic lyo without controls
Troubleshooting: What If…

- Seeds look wrinkled after drying? Slight wrinkling is normal at low moisture. If they’re brittle and crack, you over-dried or overheated—ease up on the secondary drying temp/time.
- Germ rates dipped 10–15% after storage? Re-check your thawing step (must be sealed). Add more desiccant and ensure your freezer temp is stable.
- Condensation formed inside the vial after thawing? You opened too soon. Dry the outside, reseal with fresh desiccant, return to room temp sealed, then try again.
- Indicator beads always read “wet”? Your jar or bag is leaking, or silica is saturated. Recharge silica and replace the container.
The “Freeze-dry seeds” Target Table (Numbers You Can Use)

| Step | Setting | Practical Tip |
|---|---|---|
| Pre-dry | 3–6% target moisture | Two-stage silica; weigh 100 seeds for trend |
| Pre-freeze | –35 to –50 °C | Fast freeze → smaller crystals |
| Primary Dry | 100–300 mTorr; –25 to –10 °C | Wait for weight plateau |
| Secondary Dry | +10 to +25 °C; same vacuum | Gentle heat; don’t rush |
| Packaging | Mylar or glass + desiccant | Label strain/date/lot clearly |
| Storage | –18 to –20 °C, dark | Avoid frost-free cycles |
| Thawing | Sealed to room temp | No condensation surprise |
| QA | Annual 20-seed germ test | Log and adjust next run |
Extra Tips From the Trenches

- Tiny RH cards inside vials are cheap insurance; they show if your seal failed.
- Double-bag in Mylar if you ship or move often—outer bag takes the scuffs.
- Don’t cram huge desiccant packs with tiny seed counts; balance the volume so you don’t overdry and shock seeds.
- Archive in batches. Never keep all of a rare line in one bag. Split into A/B/C packs and store separately.
- Keep a seed ledger. Date, strain, generation, moisture method, vacuum reading, freezer location, and every germ test note. That’s how you build reliability.
FAQs (Built Around What Growers Search)

Can you Freeze-dry seeds at home?
You can’t do true lyophilization without a machine, but you can dry with silica and deep-freeze safely at home for long-term storage.
Is Freeze-drying better than just air-drying?
For long storage, yes—because you reach lower moisture safely and pair it with deep cold.
What’s the best temperature to store Freeze-dried cannabis seeds?
–18 to –20 °C in a dark, stable freezer.
How dry is too dry?
Below ~3% moisture plus heat can crack tissues. Aim for 3–6%; stay gentle during secondary drying.
Do I need oxygen absorbers?
They help, but desiccant is more important. If you use both, size them correctly and seal well.
How long will Freeze-dried seeds last?
Years to decades, with annual germ checks and steady cold.
Can I refreeze seeds after opening?
Yes—but thaw sealed first, take what you need quickly in a dry room, reseal with fresh desiccant, then return to the freezer.
Will Freeze-drying change seed color or stripe pattern?
No meaningful change when done right. Color/stripes vary by genetics and maturity.
Can I Freeze-dry immature seeds to “finish” them?
No. Freeze-drying preserves; it doesn’t ripen. Harvest fully mature seed only.
What’s the fastest way to ruin seeds?
Freezing them while wet or opening cold packs and letting them sweat.
Where This Fits in Your Grower’s Playbook
- Use this when you’re archiving or scaling a seed bank.
- Pair it with good seed selection (see your “What Makes a High-Quality Marijuana Seed?” checklist) and long-term storage practices (your “Store Cannabis Seeds for 10+ Years” guide).
- Run a small test on each new line, log everything, and you’ll build a rock-solid, repeatable process.
Wrap-Up You Can Act On Today

You don’t need a PhD or a spaceship machine to protect your genetics. If you have a lyophilizer—great, follow the pro steps. If you don’t, dry smart with silica, seal tight, and freeze deep. Either way, when you Freeze-dry seeds in spirit (dry, dark, cold, still), your future harvests—years from now—will thank you.
Quick Reference List (Do This Next)
- Dry seeds with silica to 3–6%.
- If you have a lyophilizer: –40 °C → vacuum 100–300 mTorr → primary dry → secondary dry.
- Package in Mylar or glass with desiccant; vacuum-seal.
- Store at –18 to –20 °C, away from light and door swings.
- Thaw sealed. Test germ yearly. Log everything.